

Building a powerful back requires more than just pulling down cables on a machine. If you want true thickness and functional strength, the bent over row is an absolute essential — this compound movement has built legendary physiques and elite athletes for decades.
Mastering the bent over row transforms your entire upper body, targeting multiple muscle groups at once while building incredible core stability and translating into better daily posture and athletic performance.
Whether you train at a commercial gym or in your garage, this exercise adapts to your setup. Here’s how to master this foundational lift.
What is the bent over row?
The bent over row is a heavy compound exercise designed to build upper body pulling strength. You hinge at the hips, maintain a neutral spine, and pull a weight toward your torso, forcing your back muscles to work intensely against gravity.
This movement pattern mimics everyday lifting tasks, which is why it builds functional strength that protects your spine from daily wear and tear. It’s a staple in powerlifting, bodybuilding, and general fitness routines alike.
Many lifters chase muscle hypertrophy using only seated machines, but free weights demand much more bodily stabilization, providing a superior stimulus for overall muscle growth and coordination.
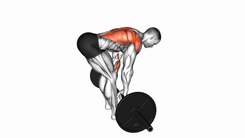
-
Muscles
- Primary
-
 Back
- Secondary
-
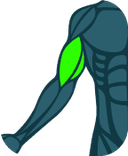 Biceps
-
 Shoulders
-
Instructions
- Stand with your feet positioned at hip width
- Hold the bar with your hands positioned at shoulder width and your palms facing backward
- Lean your torso forward while keeping the bar aligned in the same direction
- Perform the movement by pulling the bar upward until it approaches your abdomen
- Return in a controlled manner
-
Important Tips
- Avoid swinging your body forward and backward
- Keep your abdomen and glutes contracted
- Avoid using momentum or sudden movements
Barbell Bent Over Row
Bent over row muscles worked
Understanding which muscles the bent over row works helps you maximize your mind-muscle connection. This exercise recruits a large amount of muscle tissue simultaneously, stimulating excellent growth across your entire posterior chain.
Your latissimus dorsi acts as the primary mover during this lift — these large muscles create that desirable V-taper look and handle the bulk of the pulling force when you drive your elbows back.
Your rhomboids and trapezius are also heavily involved, retracting your shoulder blades together forcefully and adding thickness to your mid-back region.
Meanwhile, your erector spinae works isometrically throughout the set, keeping your torso stable and rigid so your spine doesn’t round dangerously under heavy loads.
Finally, your biceps and forearms assist in pulling the weight upward. As you hold heavy dumbbells or a loaded barbell, your grip strength gets a tremendous and continuous challenge.
Bent over row benefits
Adding this lift to your routine offers real advantages for your physique and health. Here are the top benefits you can expect:
- Increases total back thickness: It allows you to move heavy loads safely. Therefore, it triggers maximum muscle growth across your entire posterior chain.
- Improves posture: Modern life rounds our shoulders forward constantly. This exercise strengthens the muscles that pull your shoulders back into proper alignment.
- Builds core stability: Holding the hip hinge position requires massive core engagement. Consequently, it builds a highly resilient and strong midsection.
- Enhances other lifts: A stronger back improves your bench press and deadlift dramatically. Thus, it acts as a foundational builder for overall athletic power.
These benefits make it one of the most efficient back exercises available today. Moreover, you can modify it easily to match your current fitness and mobility level.
Bent over row proper form
Executing the bent over row with proper form is crucial for results and safety. Follow this step-by-step guide to master the technique and avoid injuries:
- Set your stance: Stand with your feet exactly shoulder-width apart. Keep a slight bend in your knees for optimal balance and stability.
- Hinge at the hips: Push your hips back while keeping your chest up proudly. Lower your torso until it is nearly parallel to the floor.
- Grip the weight: Grab the bar or dumbbells slightly wider than shoulder-width. You must keep your spine completely neutral and braced.
- Initiate the pull: Drive your elbows up and back toward the ceiling. Squeeze your shoulder blades together as the weight touches your lower chest.
- Control the descent: Lower the weight slowly back to the starting position. Maintain tension in your lats throughout the entire movement.
Barbell bent over row vs dumbbell bent over row
You can perform this exercise with different types of equipment, and the barbell and dumbbell versions each offer unique advantages for your training.
The barbell version allows you to lift the heaviest weight possible, making it ideal for building maximum absolute strength. The dumbbell version, on the other hand, provides a much greater range of motion.
| Feature | Barbell bent over row | Dumbbell bent over row |
|---|---|---|
| Weight capacity | Very high | Moderate to high |
| Range of motion | Limited by the bar hitting the torso | Extended past the torso |
| Muscle imbalances | Can hide a weaker side | Corrects left-to-right strength imbalances |
| Core demand | Extremely high | Moderate if using a bench for support |
Unilateral training with dumbbells is great for muscular symmetry, but the barbell remains the go-to choice for raw power development.

Breathing technique for maximum power
Proper breathing is essential when performing heavy compound lifts: it stabilizes your core and protects your lower back from injury. Master basic brace breathing before you load the bar.
Take a deep breath into your belly before initiating the pull, and brace your abdominal muscles as if you’re about to be punched. This creates intra-abdominal pressure that supports your spine safely.
Hold this breath as you pull the weight toward your chest, then exhale forcefully as you lower it back to the starting position. Resetting your breath between reps keeps your power output consistent.
Never breathe rapidly or shallowly during your repetitions. Losing core tension mid-rep can lead to immediate lower back strain. Furthermore, resetting your breath between reps ensures consistent power output.
Common mistakes and how to avoid them
Even experienced lifters make errors during this complex movement. Identifying these mistakes early prevents injuries and speeds up your progress.
One major mistake is standing too upright during the set — if your torso is at a forty-five-degree angle, you’re performing more of a shrug hybrid, and you need to hinge deeper to target your lats properly.
Another frequent error is using excessive momentum: jerking the weight up with your lower back removes tension from your upper back, so you lose the primary muscle-building stimulus of the exercise.
Finally, many people flare their elbows out too wide. While this targets the rear deltoids, it places immense stress on the shoulder joint — keep your elbows tucked comfortably for optimal lat engagement.
Essential tips for maximizing your results
Perfecting your technique takes time and consistent practice, but a few expert tips can speed up your progress and muscle growth.
First, always prioritize a neutral spine alignment — rounding your lower back places dangerous stress on your spinal discs, so keep your core braced tightly at all times.
Second, pull with your elbows rather than your hands. Imagine your hands are just hooks holding the weight — this mental cue shifts the focus directly from your biceps to your lats.
Finally, control the eccentric phase of the lift: dropping the weight quickly robs you of potential muscle growth, so take two full seconds to lower the weight on every rep.
For the full step-by-step demonstration, check out the dumbbell bent over row exercise page on BeFit.
How to warm up for the lift
Preparing your body before lifting heavy weights matters — a proper warm-up prevents injuries and improves your performance.
Start with five minutes of light cardiovascular work to elevate your core temperature and increase blood flow to your muscles, so your joints are more lubricated and ready for action.
Next, perform dynamic stretches targeting your hips and shoulders — your hamstrings need to be flexible to hold the hinge position comfortably, and your shoulders need mobility for a full range of motion.
Finally, do two or three ramp-up sets with a very light weight to practice the movement pattern and prime your central nervous system for the heavy working sets ahead.
Variations to try
Once you master the basic movement, you can explore different variations. These alternatives target your back muscles from slightly different angles for complete development.
The underhand grip row emphasizes the lower lats: you supinate your hands on the barbell, which brings in more bicep assistance and lets you lift heavier loads.
The Pendlay row starts from a dead stop on the floor for every repetition, with your torso staying strictly parallel to the ground — this builds explosive pulling power and eliminates momentum entirely.
The chest-supported row has you lying face down on an incline bench while pulling dumbbells, removing the lower back from the equation and isolating your upper back completely.
Practical application in your workout
Integrating this movement into your routine is straightforward. Place it early in your pull-day workout, when your energy and focus are highest.
Since it’s a heavy compound lift, your central nervous system needs to be fresh — doing it after lighter isolation work is a mistake, since you want maximum power for this demanding exercise.
For general hypertrophy, aim for three to four sets of eight to twelve repetitions. If strength is your main goal, four sets of five to eight reps work best.
Remember to manage your training volume carefully. You do not need endless sets to stimulate growth. Furthermore, ensure you track your rest time between sets to maintain high intensity.
Frequently asked questions
-
How to do bent over rows without hurting your back?
To protect your lower back, you must maintain a perfectly neutral spine. Hinge deeply at the hips, brace your core tightly, and never round your shoulders. Furthermore, start with lighter weights until your form is flawless.
-
What is the difference between bent over row and seated row?
The standing version requires you to support your own torso using your lower back. Conversely, the seated row stabilizes your body on a bench. Thus, the standing variation demands much more core engagement and balance.
-
Can you do bent over rows with dumbbells at home?
Yes, dumbbells are excellent for home workouts. You can perform them standing with two dumbbells or supported on a bench with one arm. Consequently, they offer a highly effective and accessible training option.
-
How many sets and reps for bent over rows?
For general muscle building, aim for three to four sets of eight to twelve repetitions. If your primary goal is absolute strength, perform four to five sets of five to eight reps. Always prioritize perfect technique.
-
Are bent over rows good for beginners?
They are fantastic for beginners when taught correctly by a professional. However, novices should start with very light weights or resistance bands. This approach builds the necessary motor control and core strength safely.
The bent over row deserves a permanent spot in your routine
The bent over row remains one of the most effective exercises for building a powerful posterior chain. Mastering the hip hinge and pulling mechanics unlocks real upper body strength and stability.
Whether you choose the barbell or dumbbell variation, consistency is your ultimate key to success. Focus on the mind-muscle connection, control the weight, and watch your back grow wider and thicker.
Are you ready to take your training to the next level? Download the BeFit app today to log your workouts and discover personalized training plans. Start building your strongest self right now!