

Building a strong core requires much more than traditional crunches — you need movements that challenge your stability and muscular endurance. Proper forearm plank form is the foundation for developing true midsection strength, yet many people struggle with lower back pain during this move simply because they lack the correct technique.
When you master proper forearm plank form, you protect your spine and maximize muscle engagement. This isometric exercise forces your entire body to work as a single unit, building the stability required for heavy lifting and daily activities.
Achieving perfect alignment takes practice and body awareness, but the effort pays off in athletic performance and injury resistance. Let’s explore the precise steps needed to execute this movement flawlessly.
What is a forearm plank?
A forearm plank is a highly effective isometric core exercise. You hold your body in a straight line parallel to the floor, with your body weight resting entirely on your forearms and your toes. This static position forces your abdominal muscles to work overtime, building incredible muscular endurance and total body tension.
Unlike dynamic movements, this hold demands constant and unwavering tension, training your core to stabilize your spine against gravity. Isometric exercises do not involve joint movement — instead, the muscles contract while maintaining the same length, which makes this movement safe for your joints when performed correctly.
Mastering this exercise is a prerequisite for advanced core training. By understanding the basics, you set the stage for long-term success, learning how to brace your midsection properly — a technique that transfers directly to heavy compound lifts like squats and deadlifts.
-
Muscles
- Primary
-
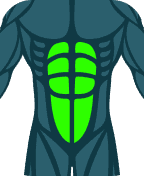 Abdominals
-
Instructions
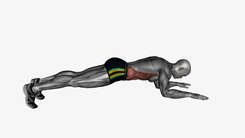
- Position yourself on the floor with your knees extended and elbows on the ground aligned with your shoulders
- Place your feet apart and in line with your hips
- Keep your knees, hips, and torso fully aligned
- Contract your abdomen, glutes, and scapular muscles
-
Important Tips
- Avoid moving your torso up and down
- Avoid letting your hips drop
- Do not position your elbows in front of or behind the shoulder line
Front Plank
The anatomy behind the forearm plank exercise
The forearm plank is famous for targeting the abdominal region, but it is truly a comprehensive full-body movement. Your rectus abdominis and transverse abdominis do the heavy lifting, while your internal and external obliques engage to prevent your torso from rotating — together, your entire midsection works in harmony to maintain the position.
Your shoulders, glutes, and quadriceps must also engage continuously. Your deltoids stabilize your upper body over your elbows, while your glutes and quads lock your pelvis and legs into a rigid line. Isometric holds like this one are widely recognized for improving overall athletic performance, which makes this exercise a valuable part of your daily routine.
Understanding this anatomy helps you establish a stronger mind-muscle connection. When you actively squeeze these muscles, the exercise becomes harder, recruiting more muscle fibers and accelerating your results — this full-body tension is the secret to improving your conditioning safely.
5 Steps to Master Proper Forearm Plank Form
Follow these five essential steps to perfect your physical alignment. This step-by-step guide ensures you get the absolute most out of every single second. Practice these cues every time you hit the mat.
- Stack your joints: Position your elbows directly under your shoulders. This creates a solid base of support and prevents shoulder strain.
- Position your feet: Extend your legs straight behind you on the floor. Keep your feet hip-width apart to maintain optimal lateral balance.
- Engage your lower body: Squeeze your glutes and quadriceps tightly. This specific action prevents your hips from sagging toward the ground.
- Brace your core: Contract your abs as if expecting a punch to the stomach. Pull your belly button upward toward your spine.
- Align your neck: Keep your cervical spine completely neutral. Look slightly ahead of your hands to avoid straining your neck muscles.
These cues might feel overwhelming at first, but they quickly become second nature with consistent practice. Focus on one step at a time until you master it, and you’ll build the perfect technique without frustration.
Proper mechanics always trump the length of time you can hold the position — a perfect twenty-second hold is better than a sloppy two-minute hold.

Benefits of Maintaining Proper Forearm Plank Form
Executing proper forearm plank form offers numerous physical advantages. First, it significantly improves your daily posture: by strengthening your deep stabilizing muscles, you naturally stand taller and straighter, which alleviates chronic tension in your upper back and neck.
It also drastically reduces the risk of lower back injuries. A strong core acts like a natural weightlifting belt for your spine, absorbing shock and stabilizing your vertebrae during sudden movements — a protective mechanism that’s vital for both athletes and desk workers alike.
You will also build real mental toughness: holding a strict isometric position requires focus and determination, and over time you’ll notice improvements in other challenging physical activities too.
Common Mistakes That Ruin Your Forearm Plank Form
Even experienced athletes sometimes struggle with their forearm plank form. Correcting these common errors is vital for your continued progress, and awareness is the first step toward better execution.
Dropping the hips is the most frequent mistake people make. This error puts dangerous shear force pressure on your lower lumbar spine. Consequently, it leads directly to lower back pain. You must constantly squeeze your glutes to keep your pelvis elevated and neutral.
Conversely, piking the buttocks into the air is another major flaw. Raising your hips too high removes the tension entirely from your core, turning a great abdominal exercise into a mediocre shoulder stretch. Keep your body as flat as a wooden board.
Finally, forgetting to breathe is a subtle but critical error. Holding your breath spikes your blood pressure unnecessarily. Furthermore, it deprives your working muscles of vital oxygen. You must breathe deeply and rhythmically into your belly throughout the entire duration.
Forearm plank variations to challenge your core
Once you master the basic hold, you can easily increase the difficulty. Try these dynamic variations to keep your workouts exciting and progressive. They add new planes of motion to your routine.
| Variation Name | Movement Type | Primary Benefit |
|---|---|---|
| Standard Forearm Hold | Static | Builds baseline endurance and stability |
| Single-Leg Lift | Dynamic | Increases glute activation and challenges balance |
| Shoulder Taps | Dynamic | Improves anti-rotation strength |
| Weighted Hold | Static | Maximizes pure core strength and density |
Adding movement to a static hold forces your core to work much harder. For instance, lifting one leg introduces instability, forcing your obliques to fire to keep your torso level. This is a great way to incorporate unilateral training principles into your core routine.
You can also transition into plank shoulder taps to challenge your coordination. Moving from your elbows to your hands requires immense control. Thus, it elevates your heart rate while torching your abdominal muscles.
Practical workout integration: How to do a forearm plank routine
Knowing how to do a forearm plank is just the very first step. You must strategically apply it to your weekly training schedule. Add this short but intense circuit to the end of your regular weightlifting session.
Perform three total rounds of the following sequence, resting for exactly thirty seconds between each round:
- Standard hold for forty seconds.
- Left side hold for twenty seconds.
- Right side hold for twenty seconds.
This tri-set targets the anterior and lateral core comprehensively and builds incredible endurance in a short amount of time. If you want to expand your routine, check out these top ab exercises to pair with your holds.
Many beginners ask how long it takes to see results at the gym from a routine like this. If you practice it three times a week, you will feel stronger within fourteen days — consistency and progressive overload are the keys to visible changes.
Advanced breathing and bracing techniques
Proper breathing mechanics separate beginners from advanced athletes. When you are in the hold, you cannot rely on shallow chest breathing. Instead, you must utilize diaphragmatic breathing. Therefore, you pull air deep into your stomach while maintaining muscular tension.
This technique creates intra-abdominal pressure. Consequently, this pressure supports your spine from the inside out. It acts exactly like an inflated balloon inside your torso. Thus, it provides a rigid structure for your limbs to move around safely.
To practice this feeling, you can try learning how to do stomach vacuum exercises. This complementary movement teaches you how to control your transverse abdominis, and your bracing technique during all isometric holds will improve as a result.
Frequently asked questions
-
What muscles does the forearm plank work?
It primarily targets the rectus abdominis, transverse abdominis, and obliques. Additionally, it engages your shoulders, glutes, and quadriceps for full-body stability.
-
How long should you hold a forearm plank?
Beginners should aim for 20 to 30 seconds of perfect tension. Advanced individuals can hold it for one to two minutes, prioritizing form over duration.
-
Why does my lower back hurt during a forearm plank?
Lower back pain usually occurs when your hips sag toward the floor. You must squeeze your glutes and brace your core to protect your lumbar spine.
-
What’s the difference between a forearm plank and a high plank?
A forearm plank rests on your elbows, placing more direct tension on the core. A high plank rests on your hands, engaging the arms and shoulders more heavily.
Start Building a Stronger Core Today
Building a resilient midsection takes dedicated time and unwavering consistency. The proper technique is your ultimate tool for long-term physical success. By focusing closely on your bodily alignment, you will safely develop impressive core strength. Moreover, you will protect your spine from the wear and tear of daily life.
Remember to breathe deeply, brace your abs hard, and keep your body perfectly straight. Never sacrifice your form just to add a few more seconds to the timer. Quality movement always dictates the quality of your fitness results. Therefore, treat every single repetition with the utmost focus and respect.
Download the BeFit app to track your progress, access guided routines, and get expert advice. Take control of your fitness journey right now and build the strong core you deserve.